Side projects are pretty common for artists across all media, but there is a prevailing misconception related in context to them. People often go, "oh, when you're not making art that is what you do", but the reality is these side projects, be it a big project or simple ritual, are just as important to the creation of art as the time in the studio making it.
Art is about thinking. Skill is mechanical and most people can figure that part out (most, definitely not all people!). To me, being an artist is creating a life where you can live in a way that facilitates having ideas come in to your head, then allows you the time, energy and money to execute those ideas. Artists lives are much broader than simply "studio time" and should be viewed as a package of activities.
That said, I love learning new things. I love setting goals and achieving them. So, when my girlfriend suggested making a pizza oven a few weeks back I said "yes"!
We live in a part of the country that is resource rich so we figured we could build an oven on a very low budget. The first thing we needed was a foundation to build the oven on. If we poured a pad then built a base with hardware store supplies, we'd have immediately been over budget. We had to get creative.
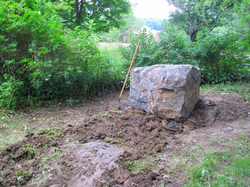
I walked across the street to my neighbors coal mine and asked nicely if I could have a rock. A really, really, really big rock! They were kind and said, "sure, go pick one out".
Me and Erin dug a pit where the rock was going to go down to about the frost line, then filled it with rocks and gravel. Meanwhile we found a BIG rock to use as the base for the oven. We set up a date to move the rock and bought lots of beer for my neighbor who was nice enough to drive it over.
He picked it up with a 5 ton capacity loader, promptly, it picked up the loader. So, we pushed it through the mine and in to my yard.
Art is about thinking. Skill is mechanical and most people can figure that part out (most, definitely not all people!). To me, being an artist is creating a life where you can live in a way that facilitates having ideas come in to your head, then allows you the time, energy and money to execute those ideas. Artists lives are much broader than simply "studio time" and should be viewed as a package of activities.
That said, I love learning new things. I love setting goals and achieving them. So, when my girlfriend suggested making a pizza oven a few weeks back I said "yes"!
We live in a part of the country that is resource rich so we figured we could build an oven on a very low budget. The first thing we needed was a foundation to build the oven on. If we poured a pad then built a base with hardware store supplies, we'd have immediately been over budget. We had to get creative.
I walked across the street to my neighbors coal mine and asked nicely if I could have a rock. A really, really, really big rock! They were kind and said, "sure, go pick one out".
Me and Erin dug a pit where the rock was going to go down to about the frost line, then filled it with rocks and gravel. Meanwhile we found a BIG rock to use as the base for the oven. We set up a date to move the rock and bought lots of beer for my neighbor who was nice enough to drive it over.
He picked it up with a 5 ton capacity loader, promptly, it picked up the loader. So, we pushed it through the mine and in to my yard.
As you can tell, it was muddy and worked as a bulldozer. It was so muddy that after dropping off the rock, the skid loader got stuck in my yard. We had to get a back hoe to pull the loader out. It was exciting!
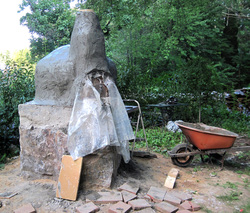
| Once the rock was in place a friend helped me level the face the best we could. We tried pry bars at first, but this thing was over 5 tons and we had no shot. We finally dug a pit, shoved in a car jack, then leveled it. The next step was pouring a flat and level surface to build the oven on. We drilled the rock and put pins in, then made a form to pour the mix in to. In the part directly under the oven, we used a vermiculite cement mixture to add insulation. 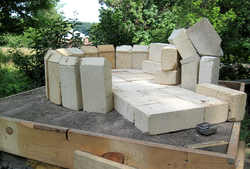 After a few days the foundation had hardened and we laid out the oven. We had picked up a pallet of hard brick from a local brick plant that recently had gone out of business. We figured out our dome, cut the bricks to fit best we could, mixed up some high heat mortar, then went at it. For the higher up parts of the dome gravity proved troubling, so we filled it with vermiculite (sand wouldve been better, but we didnt have a bag nearby). Once it was all done we walked away for about a week to let the mortar dry. 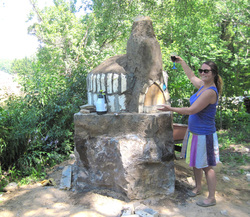 Next we emptied out the vermiculite and breathed a sigh of relief when the dome did not collapse. We then made an arch form and went to build the chimney and door. This was one of the more complicated parts. After the hard bricks were set, we added a layer of soft bricks on the sides and 2" of ceramic wool covered by vermiculite cement on top. Over insulating never hurts something you're going to make hot, at least that's my theory. |
We then had to start weather proofing the oven. We grabbed the chicken wire, the cement and the sand and did about a 2" coat for the second to last layer. This was one of those jobs I thought would take 2 people about 2 hours. It took us over 6.
At this time the metal door was also fitted moderately tight and given an internal coating of vermiculite cement for insulation.
This coat is not the final one, but we want to let it be a few months to see where/if it cracks.
After this we waited. Then waited. We lit a few small fires to help dry stuff out, but mostly, we waited.
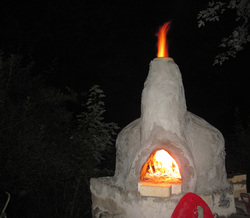
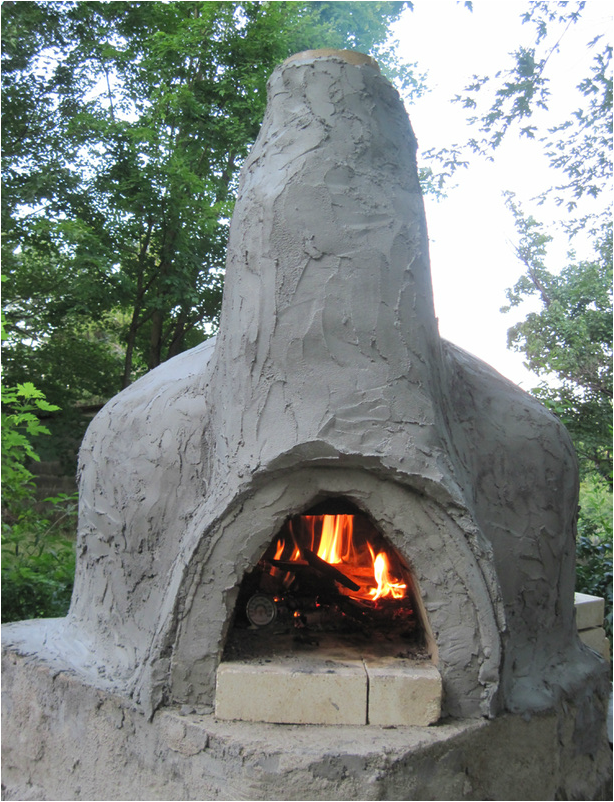
Then, we fired it! In about 90 minutes we got it to 800 degrees air temp with the oven floor at 400 degrees. The next morning, 12 hours later the oven was still at 200 degrees and 24 hours later the oven was still over 100.
Now that it's just about done, we will have to fill that time with pizza eating instead of oven building.
Now that it's just about done, we will have to fill that time with pizza eating instead of oven building.
 RSS Feed
